There are three Site Navigation control in asp.net 2.0
- SiteMapPath Control
- Menu Control
- Treeview Control
Before using Site Navigation control let go through overview of
web.sitemap, which is used as datasource to assign this control.
What is Web.SiteMap and How to Create Web.SiteMap file?Web.SiteMap file is an XML File, which contains details of navigation that is followed by navigation control.
For Creating Web.SiteMap file
- Right click the project in solution explorer and add new item.
- Select
Site Map from the add new item dialog.
- It will create "
web.sitemap" file in your root directory

A Sample format of Site Map
<siteMapNode url="" title="" description="">
<siteMapNode url="" title="" description="" />
<siteMapNode url="" title="" description="" />
</siteMapNode>
Here, siteMapNode contains following properties.
Url - describes URL to be redirect on node click.
Title - describes Text to be displayed on node.
Description - describes Text to be displayed as Tooltip.
For creating sub node, create a siteMapNode inside parent siteMapNode.
A sample web.sitemap file displaying contries and its associated cities of sales region.
<siteMapNode url="default.aspx" title="Countries" description="Sales Contries">
<siteMapNode url="india.aspx" title="India" description="Sales for India">
<siteMapNode url="ahmedabad.aspx" title="Ahmedabad" description="Sales for Ahmedabad" />
<siteMapNode url="mumbai.aspx" title="Mumbai" description="Sales for Mumbai" />
<siteMapNode url="delhi.aspx" title="Delhi" description="Sales for Delhi" />
<siteMapNode url="chennai.aspx" title="Chennai" description="Sales for Chennai" />
<siteMapNode url="bangalore.aspx" title="Bangalore" description="Sales for Bangalore" />
</siteMapNode>
<siteMapNode url="usa.aspx" title="USA" description="Sales for USA" >
<siteMapNode url="edison.aspx" title="Edison - NJ" description="Sales for Edison - NJ" />
<siteMapNode url="stcharles.aspx" title="St. Charles - IL" description="Sales for St. Charles - IL" />
<siteMapNode url="la.aspx" title="Los Angeles - CA" description="Sales for Los Angeles - CA" />
</siteMapNode>
</siteMapNode>
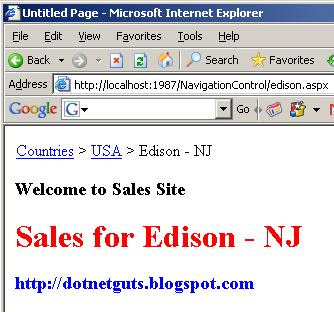
Understanding SiteMapPath ControlSiteMapPath control automatically uses web.sitemap file located in the root of your application.
Drag and drop, SiteMapPath control and it will automatically display naviagation path paved by web.sitemap file.
Example Figure1:

Example Figure2:
 Understanding TreeView Control
TreeView control display data in hierarchical order.
Drag an drop the TreeView control on to webform, note TreeView control doesn't use web.sitemap as default datasource, you need to assign it explicitly.

Select "New data source" and select sitemap and press ok.

That's it you are done.

Displaying checkbox with treeview control, you can assign "ShowCheckBox" property of TreeView control to either
- All - Checkbox to all node.
- Root - Checkbox to root node.
- Parent - Checkbox to parent node.
- Leaf - Checkbox to leaf node.
- None - No Checkbox
 Displaying Selected node code in Treeview control
 protected void btnSelected_Click(object sender, EventArgs e)
{
StringBuilder sb = new StringBuilder();
foreach (TreeNode node in TreeView1.CheckedNodes)
{
sb.Append(node.Text + "<br>");
}
Response.Write("You have selected following node: <br>" + sb.ToString());
}
 Understanding Menu Control
Like TreeView Control you need to explicitly assign data source to menu control.

Select "New data source" and select sitemap and press ok.
That's it you are done.
Bydefault menu control display root node, which generally contains single node, so you may choose option "
StaticDisplayLevels" Property to 2 to display node from 2nd level...
Example, here i am displaying node from 2nd level so my
StaticDisplayLevels will be 2.


