Showing posts with label Patterns and Practices. Show all posts

Friday, June 05, 2015

Example of Inversion of Control and Dependency Injection

What is an IOC?  or What is Inversion of Control?

IOC is mechanism by which we can add abstraction between dependencies to make them loosely coupled code.  Abstraction is added through interface.

Now lets understand this by example.

Before Implementing IOC:

I have a class called "Black_And_White_Printer"  which has one print() method.  Print() method will print in black and white.  I also have consumer class which is dependent on Black_And_White_Printer class.


    public class consumer
    {
        public void DoWork()
        {
            Black_and_White_Printer obj = new Black_and_White_Printer();
            obj.print();
        }
    }

Notice:  Consumer class is tightly coupled with Black_And_White_Printer class.  

Now let say after few months of this implementation management comes up with ColourFull_Printer and now they want Colour print rather than black and white.


public class consumer
    {
        public void DoWork()
        {
            ColourFull_Printer obj = new ColourFull_Printer();
            obj.print();
        }
    }
Notice:  Because our Consumer class is tightly coupled with Black_And_White_Printer class, we now have to change consumer class on changing the method of print.  In other words our consumer class is dependent on mechanism of print and that is reason we have to change every single time.


Understanding Problem without IOC:
  • Tightly coupled code.  i.e. Consumer is tightly dependent on Printing mechanism.
  • Requires more maintenance.  i.e. Whenever printing mechanism change we have to change our consumer class.
  • Not good for writing unit test cases.

Now, lets perform IOC on above code.  Again:  IOC is mechanism by which we can add abstraction between dependencies to make them loosely coupled code.  Abstraction is added through interface.

so In order to remove dependency betweeen consumer class and printing mechanism add an layer of abstraction using interface.


public interface IPrinter
    {
        void print();
    }

public class Black_And_White_Printer : IPrinter
    {
        public void print()
        {
            Console.WriteLine("Black and White Print");
        }
    }

public class ColourFull_Printer : IPrinter
    {
        public void print()
        {
            Console.WriteLine("Colourfull Print");
        }
    }

public class consumer
    {
        IPrinter printer;

        public consumer(IPrinter printer)
        {
           this.printer = printer;
        }


        public void DoWork()
        {
            printer.print();
        }
    }


In above code:  We first added interface name IPrinter which contains print() method.  Now each printing mechanism is required to implement IPrinter interface.  That is our case both Black_And_White_Printer class and ColurFull_Printer class has to implement IPrinter.  

Now notice inside consumer class we introduce Constructor Dependency Injection method to perform IOC.  

Advantage after implementing IOC:
  • Loosely coupled code.  i.e. Consumer is no more depended on Printing mechanism.
  • Requires less maintenance.  i.e. Whenever printing mechanism change we are not required to change our consumer class.
  • Good for writing unit test cases.


Dependency Injection Example 

Dependency Injection is mechanism by which we can inject dependency into component.  Considering our above example concept now I will show how can we perform Dependency Injection using Unity Framework.

As per above code create a console application and add files along with code as mentioned above.
  • Interface: IPrinter
  • Class: Black_And_White_Printer
  • Class: ColourFull_Printer
  • Class: Consumer

Also add nuget package: Unity container


After its installation it will add folder App_Start and 2 files.

Now open UnityConfig.cs.  We should be maintain all dependencies in this files.

For this example:  Inside method RegisterTypes()
Replace following line:
// container.RegisterType<iproductrepository, productrepository>();
With
container.RegisterType<iprinter, black_and_white_printer>();

Now open Program.cs

using DependencyInjectionExample.App_Start;
using Microsoft.Practices.Unity;

 class Program
    {
        static void Main(string[] args)
        {
            //Start the Unity Container
            UnityWebActivator.Start();
                        
            var ioc = UnityConfig.GetConfiguredContainer();

            //Create instance of consumer class
            var client = ioc.Resolve<consumer>();
            client.DoWork();

            Console.ReadLine();
        }
    }

Output:

Note:  Above code is displaying "Black and White Print" because inside UnityConfig.cs our IPrinter interface is pointing to Black_And_White_Printer class.
container.RegisterType<iprinter, black_and_white_printer>();


Now let say we want to display colurfull print then all we have to do is change the UnityConfig.cs file to following:
Replace following line:
container.RegisterType<iprinter, black_and_white_printer>();
With
container.RegisterType<iprinter, colourfull_printer>();

After making change run the application again and the output will be:


Tuesday, November 12, 2013

Easiest Repository Pattern Tutorial

I would like to explain how to implement repository pattern before we proceed any further with our single page application discussion.

What is repository pattern?
Repository pattern separates the logic that retrieves the data from the database and logic that uses the data by your application.  Thus it makes your data access layer independent of your presentation layer.

As shown in above figure:
  1. Create database table
  2. Create POCO class (Model class) with getters and setters mapping to all the properties of database table.
  3. Create Interface which list down all the operations we are going to perform on that table.  Most of the time we are doing CRUD operation (Create, Read, Update and Delete operation on table).
  4. Implementation of Interface.
  5. Presentation layer consuming interface to perform database operation.
In summary, accessing database through interface is repository pattern.  (Disclaimers: Please note I am using few sentence which are very lame in nature just to make explanation as simple as possible for anyone to understand, ones user have good understanding he can judge the things better himself).

Advantages of making use of Repository Pattern
  • Since we are accessing database through interface, presentation layer is independent of database layer.  That means you can have same data access logic reusable for multiple presentation layer (eg: console application, asp.net mvc, asp.net web form or windows form can use same data access logic.)  Similarly whenever you change the way you access data from database doesn't affect how it is rendered on presentation layer.  That means if you are using ado.net to access database, later you decide to make use of entity framework or micro-orm or web service or web api, will not require you to make any change on the presentation side.
  • Code will be more maintainable and readable.
  • Testable code.
  • Flexibility of architecture and much more (Running out of time, so google it please).
Repository Pattern Implementation Step by Step
Step 1: Create database table
For this example:  Please create 
  • "Departments" table with 2 columns
    • DeptId  int
    • DeptName varchar(35)
Department table creation script

SET ANSI_NULLS ON
GO

SET QUOTED_IDENTIFIER ON
GO

SET ANSI_PADDING ON
GO

CREATE TABLE [dbo].[Departments](
[DeptId] [int] IDENTITY(1,1) NOT NULL,
[DeptName] [varchar](35) NULL,
 CONSTRAINT [PK_Departments] PRIMARY KEY CLUSTERED 
(
[DeptId] ASC
)WITH (PAD_INDEX = OFF, STATISTICS_NORECOMPUTE = OFF, IGNORE_DUP_KEY = OFF, ALLOW_ROW_LOCKS = ON, ALLOW_PAGE_LOCKS = ON) ON [PRIMARY]
) ON [PRIMARY]

GO

SET ANSI_PADDING OFF
GO

Insert records in table script

Insert into Departments values ('Human Resource');
Insert into Departments values ('Finance');
Insert into Departments values ('Payroll');
Insert into Departments values ('Transportation');
Insert into Departments values ('Logistic');
Insert into Departments values ('Information Technology');
Insert into Departments values ('Administration');
Insert into Departments values ('Customer Care');

Ones you are done your departments table will be as shown in figure:

Step 2: Create POCO class (Model class for departments table)
Create a VS.Net Class library project for creating POCO (Plain old CLR Object) class.

Create a class called "Departments.cs" and add getters and setters for all table property.

using System;
using System.Collections.Generic;
using System.Linq;
using System.Text;
using System.Threading.Tasks;
 
namespace MyAppDemo.Model
{
    public class Departments
    {        
        public int DeptId { getset; }
        public string DeptName { getset; }
    }
}

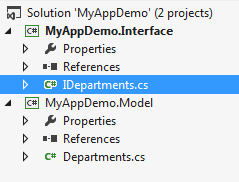
    Step 3: Create Interface and list all CRUD methods
    Create a separate VS.Net Class library project for Interface.  To do this right click solution file and add new project to existing solution.

    Ones you create Interface project add project reference for Model project into interface project.  Create a
    using System;
    using System.Collections.Generic;
    using System.Linq;
    using System.Text;
    using System.Threading.Tasks;
    using MyAppDemo.Model;
     
    namespace MyAppDemo.Interface
    {
        public interface IDepartments
        {
            void Insert(Departments model);
            void Update(Departments model);
            void Delete(long Id);
            Departments SelectOne(long Id);
            IEnumerable<Departments> SelectAll();
        }
    }
    

    Step 4: Create Interface Implementation project
    Create a separate VS.Net Class library project for Implementation.  To do this right click solution file and add new project to existing solution.

    Add reference of both model project and interface project into Implementation project.

    Since for this project I will be accessing data using entity framework.  

    Lets add Entity Framework nuget package for this project.


    In order to make use of entity framework we will need database context file.  So lets first create DB Context file and then Implementation file.

    Create a "MyAppDemoContext.cs" file.
    using System;
    using System.Collections.Generic;
    using System.Data.Entity;
    using System.Linq;
    using System.Text;
    using System.Threading.Tasks;
    using MyAppDemo.Model;
     
    namespace MyAppDemo.Implementation
    {
        public class MyAppDemoContext : DbContext
        {
            public MyAppDemoContext()
                : base("DefaultConnection")
            {
                Database.SetInitializer<MyAppDemoContext>(null);
            }
     
            public DbSet<Departments> Department { getset; }
        }
    }
    

    Now lets create implementation file.  "DepartmentsImpl.cs"
    using System;
    using System.Collections.Generic;
    using System.Linq;
    using System.Text;
    using System.Threading.Tasks;
    using MyAppDemo.Model;
    using MyAppDemo.Interface;
     
    namespace MyAppDemo.Implementation
    {
        public class DepartmentsImpl : IDepartments
        {
            // Create a Instance of DB Context
            private MyAppDemoContext db = new MyAppDemoContext();
     
            public void Insert(Departments model)
            {
                db.Department.Add(model);
                db.SaveChanges();            
            }
     
            public void Update(Departments model)
            {
                Departments foundModel = 
                    db.Department
                    .Where(a => a.DeptId.Equals(model.DeptId))
                    .FirstOrDefault();
                
                if (foundModel == null)
                    throw new Exception("Model not found");
                            
                foundModel.DeptName = model.DeptName;
                db.Department.Add(foundModel);
                db.SaveChanges();            
            }
     
            public void Delete(long Id)
            {
                Departments foundModel = 
                    db.Department
                    .Where(a => a.DeptId.Equals(Id))
                    .FirstOrDefault();
     
                if (foundModel == null)
                    throw new Exception("Model not found");
                            
                db.Department.Remove(foundModel);
                db.SaveChanges();            
            }
     
            public Departments SelectOne(long Id)
            {
                return db.Department
                        .Where(a => a.DeptId.Equals(Id))
                        .FirstOrDefault();
            }
     
            public IEnumerable<Departments> SelectAll()
            {
                return db.Department.AsEnumerable();
            }
        }
    }
    
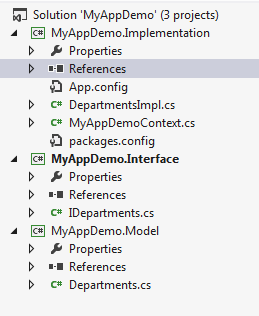
    Ones you are done with these steps your solution will look as under:


    Step 5: Presentation Layer which will be making use of data access layer through interface.
    Create a separate console project.  To do this right click solution file and add new project.
    Add connection string in App.Config file and following code for making DB listing call to your "Program.cs"
    using System;
    using System.Collections.Generic;
    using System.Linq;
    using System.Text;
    using System.Threading.Tasks;
    using MyAppDemo.Model;
    using MyAppDemo.Interface;
    using MyAppDemo.Implementation;
     
    namespace MyAppDemo.PresentationConsole
    {
        class Program
        {   
            static void Main(string[] args)
            {
                IDepartments repository = new DepartmentsImpl();
     
                //List All Departments
                List<Departments> departmentsList = repository.SelectAll().ToList();
                foreach (var department in departmentsList)
                {
                    Console.WriteLine(department.DeptName);
                }
     
                Console.WriteLine("Press any key to exit...");
                Console.ReadLine();
            }
        }
    }

    Ones you are done with all the steps your solution will look as shown in figure.
    Similarly you can add one more project for Asp.net MVC and use same DB layer.

    Download Complete Sourcecode for demo discussed in this tutorial for repository pattern.

    Thursday, September 08, 2011

    Naming Convention for Code and DB

    First let’s understand different types of casing styles.

    • 1)    UpperCase – All letters in uppercase. Example: ISITEMREQUIRED
    • 2)     LowerCase – All letters in lowercase. Example: isitemrequired
    • 3)     CamelCase – first letter in identifier is lowercase and each subsequent concatenated word is capitalized.  Example: isItemRequired
    • 4)     PascalCase – first letter in identifier and each subsequent concatenated word is capitalized.  Example: IsItemRequired

    Naming Convention for Coding

    Identifier
    Casing Style to use
    Example
    Local variable declarations
    Camel casing
    userName
    Private variables
    Camel casing
    statusMessage
    Property declaration
    Pascal casing
    ForeColor
    Public variables
    Pascal casing
    ErrorCode
    Const, Static or Readonly fields
    Pascal casing
    IsMembershipRequired
    Method Name
    Pascal casing
    ProcessApplication()
    Enum
    Pascal casing
    MembershipLevels
    Class Name
    Pascal casing
    MemberDetails
    Interface
    Pascal casing
    IDisposable, *Using “I” in front of interface name to avoid confusion between other class, while inheriting.
    Events
    Pascal casing
    SubmitButtonClick, use “Functionality name” + “Event name”
    Namespace
    Pascal casing
    CompanyName.ProjectName

    To summarize it easily, anything which is public in nature then use pascal casing.  Avoid using underscore “_” or hyphen “-“ while naming identifier.


    Naming Convention for Database

    Table name convention.
    ·         It should be in UpperCase
    ·         It should not have Spaces
    ·         Multiple words should be split with Underscore, since some of DB Client always shows DB name in uppercase, using case will not be good choice.
    ·         It should be Plural (more than one in number) - Example: EMPLOYEES Table, rather than EMPLOYEE.  If it contains multiple words only last word should be plural.  Example: EMPLOYEE_PHOTOS


    Field name convention.
    ·         It should not have Spaces
    ·         Multiple words should be split with Underscore.
    ·         It should be Singular - Example: EMPLOYEE_ID column name, rather than EMPLOYEES_ID or EMPLOYEE_IDS.

    For Datatype consideration, refer my article.

    Procedure name convention
    ·         Procedure name should be defined as TableName_ProcedureFunctionalityName.  Example: Employees_SelectAll,  Employees_Insert, Employees_Update, Employees_Delete.  If table name is too long, it is also better to use short name of table rather than full tablename prefix, Example: Emp_SelectAll, Emp_Insert.  If table name contains multiple words like Employee_Locations then it is better to give name like EL_SelectAll, EL_Insert.  If short name are getting duplicate, then you can change of one of short name to avoid duplication or confusion.
    ·         If you are creating procedure which is general in nature or combines 2 or more tables or mainly business logic which cannot be associated with any table, then it is better to use as BusinessLogicName_ProcedureFunctionalityName.  Example:  procedure for employees quarterly sales report should be named something like Reports_Emp_Quaterly_Sales.  That way you can combine all reports procedure together to easily find them in a complex database structure.
    ·         Remember, naming convention is to help finding things easily and a standard which can be easily explain to anyone joining a development team.  So always name considering this scenario in mind.

    Function name convention
    ·         Function name are mostly generic utilities, but incase if they are associated with table, then follow procedure naming convention approach, else use meaningful name.  Example:  AgeFromDOB  - If you pass a valid date, this function will return age, no. of years between current date and DOB.

    Primary Key convention
    ·         Primary key should be name as PK_TableName.  Example:  PK_Employees.   If you are using SQL Server, whenever you are creating primary key in table designer, it will automatically follows above naming convention.

    Foreign Key convention
    ·         Foreign key should be name as FK_PrimaryTableName_ForeignTableName.  Example:  PK_Employees_Departments.   If you are using SQL Server, whenever you are creating foreign key in table designer, it will automatically follows above naming convention.

    Constraint name convention
    ·         Constraint name should be name as ConstraintShort_ConstraintColumnName.  Example: 
    Default value constraint for IsActive column field in employe table should be 1 (or true).  DF_IsActive.  Here DF stands for Default value constraint and IsActive is column field in Employees Table.

    Index name convention
    ·         Index name should be name with prefix idx_ColumnName.  Example: 
    Idx_Employee_ID

    Tuesday, October 28, 2008

    Application Architecture Guide Book for Microsoft .Net Patterns and Practise

    Application Architecture Guide Book for Microsoft .Net Patterns and Practise V2.0 is Released (Beta 1)

    Download Book Application Architechture Guide V2.0

    Index of Application Architecture Guide Book

    Parts
    Part I, Fundamentals of Application Architecture
    Part II, Design
    Part III, Layers
    Part IV, Quality Attributes
    Part V, Archetypes - Design and Patterns

    Chapters
    Introduction
    Architecture Best Practices At a Glance
    Fast Track - A Guide for Getting Started and Applying the Guidance

    Part I, Fundamentals of Application Architecture
    Chapter 1 - Fundamentals of Application Architecture
    Chapter 2 - .NET Platform Overview
    Chapter 3 - Application Archetypes
    Chapter 4 - Deployment Patterns
    Chapter 5 - Architectural Styles
    Chapter 6 - Quality Attributes
    Chapter 7 - Layers and Tiers

    Part II, Design
    Chapter 8 - Designing Your Architecture
    Chapter 9 - Architecture and Design Guidelines
    Chapter 10 - Designing Services
    Chapter 11 - Communication Guidelines

    Part III, Layers
    Chapter 12 - Presentation Layer Guidelines
    Chapter 13 - Business Layer Guidelines
    Chapter 14 - Data Access Layer Guidelines
    Chapter 15 - Service Layer Guidelines

    Part IV, Quality Attributes
    Chapter 16 - Performance Engineering
    Chapter 17 - Security Engineering

    Part V, Archetypes - Design and Patterns
    Chapter 18 - Mobile Application
    Chapter 19 - Office Business Application (OBA)
    Chapter 20 - Rich Client Application
    Chapter 21 - Rich Internet Application (RIA)
    Chapter 22 - Service Archetype
    Chapter 23 - SharePoint LOB Application
    Chapter 24 - Web Application

    Appendix
    Cheat Sheet - patterns & practices Catalog at a Glance
    Cheat Sheet - patterns & practices Pattern Catalog
    Cheat Sheet - patterns & practices Enterprise Library

    Wednesday, February 27, 2008

    What is Gudiance Automation Extensions and Guidance Automation Toolkit

    About Guidance Automation Toolkit
    The Guidance Automation Extensions (GAX) expands the capabilities of Visual Studio by allowing architects and developers to run guidance packages, such as those included in Software Factories, which automate key development tasks from within the Visual Studio environment.
    The Guidance Automation Toolkit (GAT) is a guidance package which allows architects to author rich, integrated user experiences for reusable assets including Software Factories, frameworks, and patterns. The resulting Guidance Packages, composed of templates, wizards and recipes, help developers build solutions in a way consistent with the architecture guidance. In order to use the Guidance Automation Toolkit, you must first install the Guidance Automation Extensions.

    Understanding Guidance Automation Toolkit
    Part 1:Introduction to the Guidance Automation June 2006 CTP
    Part 2: Creating a Guidance Package
    Part 3: Creating a C# project
    Part 4: Adding project references
    Part 5: Tuning the C# projects
    Part 6: Generating classes

    Guidance Automation Extensions and Guidance Automation Toolkit February 2008 Final Release
    MSDN site: http://msdn2.microsoft.com/en-us/teamsystem/aa718948.aspx
    Community Form: http://forums.microsoft.com/msdn/showforum.aspx?forumid=78&siteid=1

    Most Recent Post

    Subscribe Blog via Email

    Enter your email address:


    Disclaimers:We have tried hard to provide accurate information, as a user, you agree that you bear sole responsibility for your own decisions to use any programs, documents, source code, tips, articles or any other information provided on this Blog.
    Page copy protected against web site content infringement by Copyscape