Tuesday, November 12, 2013

Easiest Repository Pattern Tutorial

I would like to explain how to implement repository pattern before we proceed any further with our single page application discussion.

What is repository pattern?
Repository pattern separates the logic that retrieves the data from the database and logic that uses the data by your application.  Thus it makes your data access layer independent of your presentation layer.

As shown in above figure:
  1. Create database table
  2. Create POCO class (Model class) with getters and setters mapping to all the properties of database table.
  3. Create Interface which list down all the operations we are going to perform on that table.  Most of the time we are doing CRUD operation (Create, Read, Update and Delete operation on table).
  4. Implementation of Interface.
  5. Presentation layer consuming interface to perform database operation.
In summary, accessing database through interface is repository pattern.  (Disclaimers: Please note I am using few sentence which are very lame in nature just to make explanation as simple as possible for anyone to understand, ones user have good understanding he can judge the things better himself).

Advantages of making use of Repository Pattern
  • Since we are accessing database through interface, presentation layer is independent of database layer.  That means you can have same data access logic reusable for multiple presentation layer (eg: console application, asp.net mvc, asp.net web form or windows form can use same data access logic.)  Similarly whenever you change the way you access data from database doesn't affect how it is rendered on presentation layer.  That means if you are using ado.net to access database, later you decide to make use of entity framework or micro-orm or web service or web api, will not require you to make any change on the presentation side.
  • Code will be more maintainable and readable.
  • Testable code.
  • Flexibility of architecture and much more (Running out of time, so google it please).
Repository Pattern Implementation Step by Step
Step 1: Create database table
For this example:  Please create 
  • "Departments" table with 2 columns
    • DeptId  int
    • DeptName varchar(35)
Department table creation script

SET ANSI_NULLS ON
GO

SET QUOTED_IDENTIFIER ON
GO

SET ANSI_PADDING ON
GO

CREATE TABLE [dbo].[Departments](
[DeptId] [int] IDENTITY(1,1) NOT NULL,
[DeptName] [varchar](35) NULL,
 CONSTRAINT [PK_Departments] PRIMARY KEY CLUSTERED 
(
[DeptId] ASC
)WITH (PAD_INDEX = OFF, STATISTICS_NORECOMPUTE = OFF, IGNORE_DUP_KEY = OFF, ALLOW_ROW_LOCKS = ON, ALLOW_PAGE_LOCKS = ON) ON [PRIMARY]
) ON [PRIMARY]

GO

SET ANSI_PADDING OFF
GO

Insert records in table script

Insert into Departments values ('Human Resource');
Insert into Departments values ('Finance');
Insert into Departments values ('Payroll');
Insert into Departments values ('Transportation');
Insert into Departments values ('Logistic');
Insert into Departments values ('Information Technology');
Insert into Departments values ('Administration');
Insert into Departments values ('Customer Care');

Ones you are done your departments table will be as shown in figure:

Step 2: Create POCO class (Model class for departments table)
Create a VS.Net Class library project for creating POCO (Plain old CLR Object) class.

Create a class called "Departments.cs" and add getters and setters for all table property.

using System;
using System.Collections.Generic;
using System.Linq;
using System.Text;
using System.Threading.Tasks;
 
namespace MyAppDemo.Model
{
    public class Departments
    {        
        public int DeptId { getset; }
        public string DeptName { getset; }
    }
}

    Step 3: Create Interface and list all CRUD methods
    Create a separate VS.Net Class library project for Interface.  To do this right click solution file and add new project to existing solution.

    Ones you create Interface project add project reference for Model project into interface project.  Create a
    using System;
    using System.Collections.Generic;
    using System.Linq;
    using System.Text;
    using System.Threading.Tasks;
    using MyAppDemo.Model;
     
    namespace MyAppDemo.Interface
    {
        public interface IDepartments
        {
            void Insert(Departments model);
            void Update(Departments model);
            void Delete(long Id);
            Departments SelectOne(long Id);
            IEnumerable<Departments> SelectAll();
        }
    }
    

    Step 4: Create Interface Implementation project
    Create a separate VS.Net Class library project for Implementation.  To do this right click solution file and add new project to existing solution.

    Add reference of both model project and interface project into Implementation project.

    Since for this project I will be accessing data using entity framework.  

    Lets add Entity Framework nuget package for this project.


    In order to make use of entity framework we will need database context file.  So lets first create DB Context file and then Implementation file.

    Create a "MyAppDemoContext.cs" file.
    using System;
    using System.Collections.Generic;
    using System.Data.Entity;
    using System.Linq;
    using System.Text;
    using System.Threading.Tasks;
    using MyAppDemo.Model;
     
    namespace MyAppDemo.Implementation
    {
        public class MyAppDemoContext : DbContext
        {
            public MyAppDemoContext()
                : base("DefaultConnection")
            {
                Database.SetInitializer<MyAppDemoContext>(null);
            }
     
            public DbSet<Departments> Department { getset; }
        }
    }
    

    Now lets create implementation file.  "DepartmentsImpl.cs"
    using System;
    using System.Collections.Generic;
    using System.Linq;
    using System.Text;
    using System.Threading.Tasks;
    using MyAppDemo.Model;
    using MyAppDemo.Interface;
     
    namespace MyAppDemo.Implementation
    {
        public class DepartmentsImpl : IDepartments
        {
            // Create a Instance of DB Context
            private MyAppDemoContext db = new MyAppDemoContext();
     
            public void Insert(Departments model)
            {
                db.Department.Add(model);
                db.SaveChanges();            
            }
     
            public void Update(Departments model)
            {
                Departments foundModel = 
                    db.Department
                    .Where(a => a.DeptId.Equals(model.DeptId))
                    .FirstOrDefault();
                
                if (foundModel == null)
                    throw new Exception("Model not found");
                            
                foundModel.DeptName = model.DeptName;
                db.Department.Add(foundModel);
                db.SaveChanges();            
            }
     
            public void Delete(long Id)
            {
                Departments foundModel = 
                    db.Department
                    .Where(a => a.DeptId.Equals(Id))
                    .FirstOrDefault();
     
                if (foundModel == null)
                    throw new Exception("Model not found");
                            
                db.Department.Remove(foundModel);
                db.SaveChanges();            
            }
     
            public Departments SelectOne(long Id)
            {
                return db.Department
                        .Where(a => a.DeptId.Equals(Id))
                        .FirstOrDefault();
            }
     
            public IEnumerable<Departments> SelectAll()
            {
                return db.Department.AsEnumerable();
            }
        }
    }
    
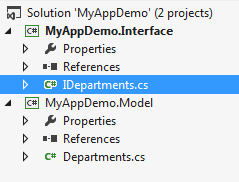
    Ones you are done with these steps your solution will look as under:


    Step 5: Presentation Layer which will be making use of data access layer through interface.
    Create a separate console project.  To do this right click solution file and add new project.
    Add connection string in App.Config file and following code for making DB listing call to your "Program.cs"
    using System;
    using System.Collections.Generic;
    using System.Linq;
    using System.Text;
    using System.Threading.Tasks;
    using MyAppDemo.Model;
    using MyAppDemo.Interface;
    using MyAppDemo.Implementation;
     
    namespace MyAppDemo.PresentationConsole
    {
        class Program
        {   
            static void Main(string[] args)
            {
                IDepartments repository = new DepartmentsImpl();
     
                //List All Departments
                List<Departments> departmentsList = repository.SelectAll().ToList();
                foreach (var department in departmentsList)
                {
                    Console.WriteLine(department.DeptName);
                }
     
                Console.WriteLine("Press any key to exit...");
                Console.ReadLine();
            }
        }
    }

    Ones you are done with all the steps your solution will look as shown in figure.
    Similarly you can add one more project for Asp.net MVC and use same DB layer.

    Download Complete Sourcecode for demo discussed in this tutorial for repository pattern.

    Monday, November 11, 2013

    Understanding Flow of control for Hot Towel SPA Template

    Like any other application HTS is not following default route of having Global.asax as starting point.  "I believe" this is not good and there are few other things which "I believe" you won't do it for your production code which we will be going to customize in upcoming blog post.

    Flow of process for Hot Towel SPA template

    • App_Start/BreezeWebApiConfig.cs/RegisterBreezePreStart()
    • App_Start/HotTowelRouteConfig.cs/RegisterHotTowelPreStart()
    • Root/Global.asax/Application_Start()
    • App_Start/FilterConfig.cs/RegisterGlobalFilters()
    • App_Start/RouteConfig.cs/RegisterRoutes()
    • App_Start/HotTowelConfig.cs/PreStart()
    • Controllers/HotTowelController.cs/Index()
    • Views/HotTowel/Index.cshtml
    • App/Main.js/boot()
    • App/Shell.js/boot()
    • App/Home.js/activate()
    Understanding of above process will be very helpful in customizing Hot Towel SPA template to suits your needs.

    Situation where above process flow is very helpful
    • Customizing Application specific settings
    • Remove breeze and adding support for web api
    • Adding any more JS support.
    In next post we will understand how to customize hot towel spa to suits your custom needs.

    First Single Page App (SPA) using Hot Towel SPA Template

    In this post, I will be creating our first SPA application using Hot towel SPA template.

    If you haven't installed VS.Net 2012.2 Update, then please do it now before reading further.

    Step 1: Open VS.Net and start creating asp.net mvc application


    Step 2: There are 2 default template available for creating SPA application, choose "Hot Towel SPA" template

    Step 3: Ones your solution is ready, you will notice all SPA related files in App folder.  You will also notice that Hot Towel SPA (HTS) has taken care of initial plumbing of installing durandal.js, require.js, bootstrap, breeze, etc.

    App Folder Stucture

    • Views Folder - Contains HTML files, it will have plain html code which is used for presentation.
    • ViewModels Folder - Contains Javascript files, it will have logic regarding how you are going to access model, jquery web api calls and databind related logic (Knockout)
    • Services Folder - Can be used for storing global SPA code which can be shared among all SPA pages.


    Special SPA Files

    • Main.js File - It will contain logic for applying SPA application related settings and starting SPA application.
    • Shell.js File - It will contain navigation related logic


    SPA Convention

    • In order to create new page in HTS, you will have to create html file in view and javascript file with same name in viewmodel.
      • Example: details.html and details.js files 
    • You can then write navigation logic in shell.js file.


    Now lets run the application to view how it looks :)

    In next post we will understand, how to perform basic customization to default HTS template.

    Single Page Application (SPA) - Overview

    For those of you haven't got chance to work on Single Page Application (SPA), I will be discussing few of my learning in series of post, including how to perform CRUD operation using both Breeze and Web Api.

    What is Single Page Application (SPA)?
    (From Asp.net Site) ASP.NET Single Page Application (SPA) helps you build applications that include significant client-side interactions using HTML 5, CSS 3 and JavaScript. It’s now easier than ever before to getting started writing highly interactive web applications.

    In my own words:

    • SPA application doesn't requires page postback.
    • SPA application works very well with web api and it can be used for good user experience (UX).
    • SPA application doesn't mean that, their will be only single page in your application.  It will be multipage application which doesn't requires postback 
    • From developers point of view, SPA is javascript way of doing MVC, when working with VS.Net and asp.net mvc.
    • SPA technology is not new but with KnockoutJS and other javascript framework now making SPA application will be much more easier than few years back.

    Example of SPA 

    Before you start any further reading, I would highly recommend to go over John Papa's introductory training video about SPA on Pluralsight.

    VS.Net comes with default SPA template when you install VS.Net 2012.2 update.  However I will highly recommend using John papa's Hot Towel SPA template since it comes up with initial plumbing work for you so that you are get, set, go to develop SPA application.

    Since John is stressing more on using breeze to make DB call, which "I believe" is not good, since it is very hard to implement "Repository Pattern" and I don't like javascript files spreading across multiple project is good.  Instead "I believe" the best way to go with SPA is make use of Hot towel SPA and take out breeze related stuff from project and hook up web api related plumbing.  Since Web api calls are not javascript dependent we can easily spread our code across multiple solution without including javascript file and can do whatever we like.  (Specially it is very easy to implement repository pattern in SPA using Web api rather than using Breeze.)

    My views on Breeze Vs Web Api
    • I personally find it is very easy and fast to develop SPA application using Breeze and it is easy to do client side caching of data.
    • Web api is best way to work with SPA since you are not dependent on javascript plumbing to do DB call.
    • If you are not sure about which route to go, I would recommend you to try implementing Repository Pattern with both Breeze and Web Api and it will make your decision simple.

    In my whole series I will be making use of Hot Towel SPA Template to create all application.

    Hot Towel SPA Template is combination of 


  • ASP.NET MVC 

  • ASP.NET Web API  

  • Breeze.js - rich data management   

  • ASP.NET Web Optimization - bundling and minification 

  • Durandal.js - navigation and view composition 

  • Knockout.js - data bindings 

  • Require.js - Modularity with AMD and optimization 

  • Toastr.js - pop-up messages 

  • Twitter Bootstrap - robust CSS styling

  • Teched Video Tutorial for SPA


    Few dev tips while working on SPA
    • Most of the time when you are working on SPA, if you run into problem.  Search appropriately to get quicker solution:  For example: If you are facing problem in data binding then search for "Knockout" rather than "Hot towel spa" or "SPA".  Similarly if you run into problem for navigation then search for "Durandal", If you are running into problem for CSS search for "Bootstrap" and so on.
    • Have F12 (Developers tool open while working on SPA)
    • If something is not displaying on screen as expected, check "Console Log" for browser - Shortcut - Cntrl + Shift + J
    • Always "Disable cache" 
      • In chrome go to settings at the right end corner and select Disable cache (while Dev Tools is open)
    • Make use of "Internet Explorer (IE) while working with VS.Net" if you are facing trouble while debugging javascript file. Javascript debugging works very well when we are working with IE and VS.Net
    • Master concept of Knockout.Js and Web Api.  On High level SPA is all about using Knockout.Js and Web api (Please note: I am assuming here that user will be using Hot Towel SPA template and using all combination as describe above)

    In next post we will create our first SPA application using Hot towel spa template.

    Saturday, November 09, 2013

    NotMapped attribute for PetaPoco or Ignore Column while Insert/Update in Petapoco

    NotMapped Property for PetaPoco or Ignore Column while Insert/Update in Petapoco

    [NotMapped]   ==>  [ResultColumn]

    [NotMapped] equivalent of entity framework in Petapoco is [ResultColumn]

    For more information

    Example:  If you have contact form model where you want user to enter captcha, but you don't want this captcha to be store in db, so In order to ignore captcha column while inserting values in database you can mark the column as [NotMapped] in entity framework and if you are using Petapoco you can use attribute [ResultColumn]

    [TableName("contact")]
    [ExplicitColumns]
    public class contact
    {
        [Column] 
        public string FullName { get; set; }
        
        [Column] 
        public string Feedback { get; set; }
        
        [ResultColumn] 
        public string Captcha { get; set; }
    }

    Friday, November 01, 2013

    Delete all the rows from all the tables in SQL Server

    If you are in situation where you just want empty database structure, without having data in it.

    Run following select statement which will generate set of delete statement to delete all the records for all the tables in your database.

    SELECT
    'Delete from ' + Table_Catalog + '.' + Table_Schema + '.' + Table_Name + ';' 
    FROM INFORMATION_SCHEMA.TABLES
    WHERE Table_Type = 'BASE TABLE'
    ORDER by TABLE_NAME


    In case your database is large and you want to know status of which table is currently getting deleted you can use following:

    SELECT
    'Print(''Delete started for ' + Table_Catalog + '.' + Table_Schema + '.' + Table_Name + ''');' +
    'Delete from ' + Table_Catalog + '.' + Table_Schema + '.' + Table_Name + ';' +
    'Print(''Delete done for ' + Table_Catalog + '.' + Table_Schema + '.' + Table_Name + ''');'  +
    'Print(''.............'');'
    FROM INFORMATION_SCHEMA.TABLES
    WHERE Table_Type = 'BASE TABLE'
    ORDER by TABLE_NAME

    Most Recent Post

    Subscribe Blog via Email

    Enter your email address:


    Disclaimers:We have tried hard to provide accurate information, as a user, you agree that you bear sole responsibility for your own decisions to use any programs, documents, source code, tips, articles or any other information provided on this Blog.
    Page copy protected against web site content infringement by Copyscape